Directed Differentiation

Target Grades: 5-8

In this activity, participants will explore how stem cells can change, or differentiate, into other cell types. This can occur spontaneously due to stress or because of changes in their environment. Participants will also discover how scientists can encourage, or direct, a stem cell to differentiate into a certain cell type by adding growth factors or changing certain conditions.

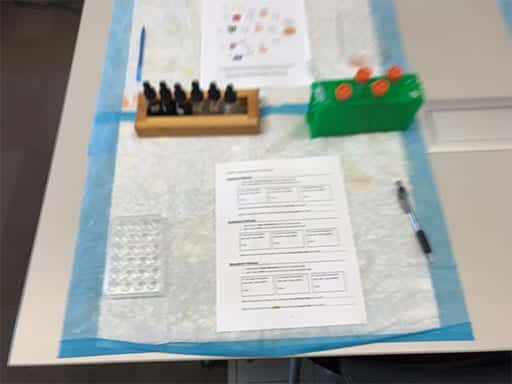
This activity will guide participants through a method for screening compounds to see how they affect the fate of how the stem cell might change under those conditions.

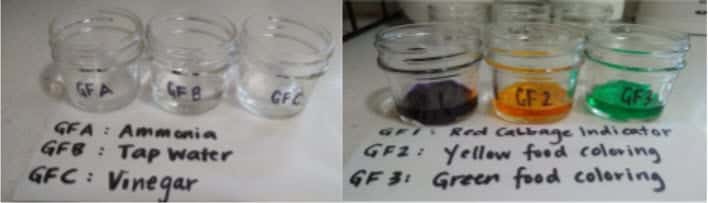
First, participants will add a drop of water, this models the pluripotent stem cells growing in a dish in a laboratory. These cells have the potential to change into a different cell type, such as the examples in the worksheet including muscle cells of the heart or retina cells of the eye.

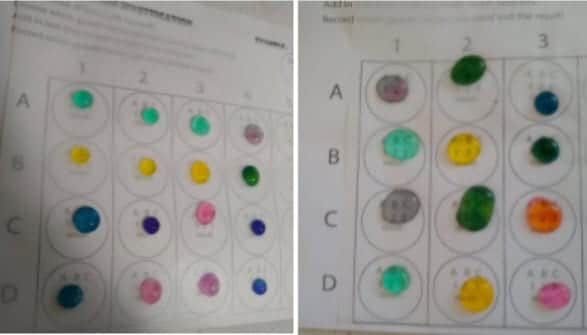
Then, using the worksheet to record your method, choose different combinations of chemicals, modeled here as growth factors, that will model how the stem cell will interpret these signals to go down a pathway to change into a different type of cell, called directed differentiation.

Participants will need to mark down which chemicals they used for each trial, and the results of the trial will be a color change. Record the color change and use the pathway chart to determine what cell type your stem cells changed to based on their color. If the color doesn’t match anything on the chart, encourage the participants to think about what that might mean (i.e. controlled experiments, experimental error, new cell types, repeatability, etc.)?

Instructions

  • At Home Instructions

    At Home Instructions

    Materials

    • Straw pipette
    • Wax paper (8” x 6” or so)
    • 2 copies Diagram (print or sketch your own)
    • Paper towels or napkins
    • Colored pencil/marker
    • “Stem cell” culture (tap water)
    • Growth factors (GF)
      • GF A: household ammonia
      • GF B: tap water
      • GF C: vinegar
      • GF 1: 1/16 tsp of cabbage juice indicator powder mixed with 1 Tbsp tap water
      • GF 2: 1 drop yellow food coloring in 1 Tbsp tap water
      • GF 3: 1 drop green food coloring in 1 Tbsp tap water

    Parent/Adult Advance Preparation

    1. Make plastic straw pipettes!

    1. Make plastic straw pipettes!
    2. Materials: plastic straw, scissors, iron, parchment paper
    3. Cut plastic straws in half or thirds.
    4. Heat up an iron.
    5. Tuck straw between 2 layers of parchment paper on a heat safe surface suitable for ironing.
    6. Carefully apply the heated iron to the end of the straw until it is melted together and forms a tight seal.
    7. To use the pipette, pinch the straw pipette, and dip in liquid while keeping the pipette pinched. Release the pinch while the open end of the straw pipette is submerged in liquid. When you release the pinch, several drops of liquid should be in the pipette. Move the pipette to where you’d like to transfer the liquid to, and squeeze gently to release a drop.

    2. Prepare growth factors

    Prepare growth factors

    1. You will need approximately 1 Tbsp of each of the following growth factors
      1. GF A: household ammonia (Ammonia material safety sheet)
      2. GF B: tap water
      3. GF C: vinegar (Vinegar material safety sheet)
      4. GF 1: 1/16 tsp of red cabbage indicator powder mixed with 1 Tbsp water (Red Cabbage indicator powder material safety sheet)
      5. GF 2: 1 drop yellow food coloring in 1 Tbsp tap water
      6. GF 3: 1 drop green food coloring in 1 Tbsp tap water
    2. You can make the red cabbage juice indicator at home from red cabbage or purchase it already prepared.
      1. To make it
      2. To purchase it
    3. Prepare a solution of “stem cells.”
      1. In a small container, put at least 2 Tbsp of tap water.
      2. Label “stem cells”
    4. Print sheets or sketch your own!
      1. Print the worksheet
      2. Or, you can view the worksheet and sketch it.

    Activity Directions

    1. Place wax paper over one copy of the worksheet. Place a second worksheet for recording data next to it.
    2. Using a pipette, transfer one drop of stem cells to each well of the well plate drawn on the worksheet.
    3. Using a dedicated pipette for each growth factor, treat the stem cells with different combinations of growth factors. You can add 1 growth factor to a well, or all 6! Be sure to only add one drop (not a pipette-full) of any growth factor to any of the wells. As you add a growth factor, record it on the data collection worksheet next to the sheet with the wax paper on it.
    4. Helpful tips: make sure wax paper is flat. You may want to weigh it down if it is curling at the edges. If dops begin to slide towards other drops, you can use a clean toothpick to attempt to move them back or use paper towels to eliminate that drop and begin again in that well.
    5. As you add the growth factors, or signals, to the stem cells, you may notice some changes occur. In this simulation, a color change indicates that the stem cell has differentiated or changed into a different type of cell.
      • If the solution turns blue in our simulation, you have signaled the stem cell to turn into a nerve cell!
      • If the solution turns purple in our simulation, you have signaled the stem cell to turn into a skin cell!
      • If the solution turns pink in our simulation, you have signaled the stem cell to turn into a muscle cell!
      • If the solution turns orange in our simulation, you have signaled the stem cell to turn into a red blood cell!

  • In Class Instructions for Teacher

    In Class Instructions for Teacher

    Materials

    • Goggles and gloves
    • Cell Culture plates (12 to 24 well plates) – one per student
    • Water in a 15 mL conical tube (for the “cell culture”) – one per pair
    • P1000 Pipettes (all) and tips
    • Absorbent Pads – one per placemat per student
    • “Growth factor” dropper bottles (A, B, C and 1, 2, 3) – in wooden rack, one set per pair
    • Directed Differentiation Worksheets – one per student (Worksheet)
    • Pens/pencils
    • Coupled with Cryopreservation.

    Setup

    1. Growth factor dropper bottles prepared and labeled as follows (one set per pair):
      • GF A: Colorless household ammonia
      • GF B: Tap or distilled water
      • GF C: White distilled vinegar
      • GF 1: Universal Indicator Solution
      • GF 2: Food color solution (1 drop black food color + 100 mL water)
      • GF 3: Bromothymol Indicator (0.1 g Bromothymol + 100 mL water)
    2. Set out the Directed Differentiation Activity Worksheet and pens/pencils (one per student)
    3. Place the “Cell culture” tubes in rack
    4. Place the disposable pipettes for the “cell culture” at each pair station

    Note: If student culture wells begin to look discolored, some of the dropper bottles may have been contaminated with other solutions. If this occurs, empty and refill the suspected containers for the next class.

    Running the Activity

    Introduction

    • Embryonic stem cells need very specific conditions to thrive as undifferentiated pluripotent cells. Any changes in the environment can cause the cells to differentiate, or develop the traits and function of a more specialized cell type. Scientists can induce differentiation of stem cells by changing factors in the cells’ environment. The stem cells receive chemical signals from the media they grow in that can initiate the changes needed for differentiation. These are called growth factors.
    • Differentiation is the ability of a stem cell to turn into another cell type. All embryos must do this as they grow all the different tissues and organ systems that make up a human being.
    • In early development, a fertilized egg will being to grow into three layers, called germ layers. The innermost layer is called the endoderm and it will eventually become the internal organs, like the pancreas. The middle layer is called the mesoderm, and it will develop into things like muscle cells and blood. The outermost layer, which is called the ectoderm, will develop into tissues like nerve cells and skin.
    • Endoderm, mesoderm and ectoderm cells are called multipotent, which means that a cell from that particular layer can turn into any of the cells related to that particular layer. Once a pluripotent cell differentiates into one of the germ layers, it is no longer pluripotent, because it cannot become any type of cell in the body.
    • Point out the differentiation chart on Master 3.1.

    Differentiation Activity

    • In order to get our culture of stem cells into the three germ layers, we will need to add the growth factors A, B, and C to our culture. Then we will experiment with growth factors 1, 2, and 3 to see which ones will lead to the cells differentiating into pancreatic cells, red blood cells, muscle cells, skin cells and nerve cells.
    • Follow the directions on the worksheet to complete the activity.

    Closing

    • Review vocabulary and key concepts.
    • Invite students to share which differentiated cells they were able to develop, and which growth factors they used to get there.

    Clean Up

    1. Rinse out well plates and tap to dry.
    2. Return materials to the bin.
    3. Return bin to Stax.

    Set-Up Pictures

Questions to Think About

  1. If you directed a stem cell to turn into another cell type, what growth factors were important for that change? Was there more than one combination of growth factors that lead to that cell type?
    1. In the lab, working with real human stem cells, there can be more than one ‘recipe’ or method to get to a particular cell type.
  2. How long did it take you to get stem cells to differentiate into a different cell type?
    1. In the lab, working with real human stem cells, it can take days or weeks to direct stem cells to differentiate, or change to another cell type!
  3. How did you know your stem cells had turned into another cell type?
    1. In the lab, working with real human stem cells, they usually don’t turn colors when they differentiate, or turn into another cell type. The cells might change shape to start to look more like the cell that they are becoming, and they will start to do the jobs that those cells do in the body. When scientists turn stem cells into beating heart cells (cardiomyocytes), they look like heart muscle cells and they even start to contract, or beat, in a dish! The only cells that might turn color in real life are red blood cells, which are reddish in color!
  4. Are the “stem cells” used in this simulation real, live, human stem cells?
    1. No, we are using water to represent stem cells in this simulation. A solution of stem cells looks like water, since the stem cells are clear and tiny and colorless. In the lab, when we work with real human stem cells, we have to use specialized equipment to keep the cells protected from us and to protect the scientists from the stem cells.

Find out more about current UW–Madison Stem Cell Researchers!

  • David Gamm’s Lab studies how stem cells can be used to help understand eye diseases
  • The Palecek Lab studies stem cells and how we can engineer tissues
  • Tim Kamp studies how stem cells could apply to cardiovascular medicine
WARF
Morgridge Institute for Research

In the interest of making the educational materials, lessons, and instructions on this site widely available and free of charge, by using this site you agree that under no circumstances will WARF, the Morgridge Institute for Research, and the University of Wisconsin-Madison, and their respective employees, trustees, contractors, and agents, be liable for any special or consequential damages that result from the use of, or the inability to use, the materials, lessons, or instructions on this site, even if advised of the possibility of such damages.