Short Summary:
This device is designed for use with an upright multiphoton microscope for neuroimaging of the adult and juvenile zebrafish. It allows for fast and reproducible mounting of fish with minimal restraint. This non-invasive approach allows for fish to be easily recovered from the imaging chamber for use in future experiments. We have demonstrated stable imaging for up to 2 hours, however Castranova et. al (DOI: 10.1242/dev.199667) have demonstrated recovery is possible from imaging sessions of 20+ hours.
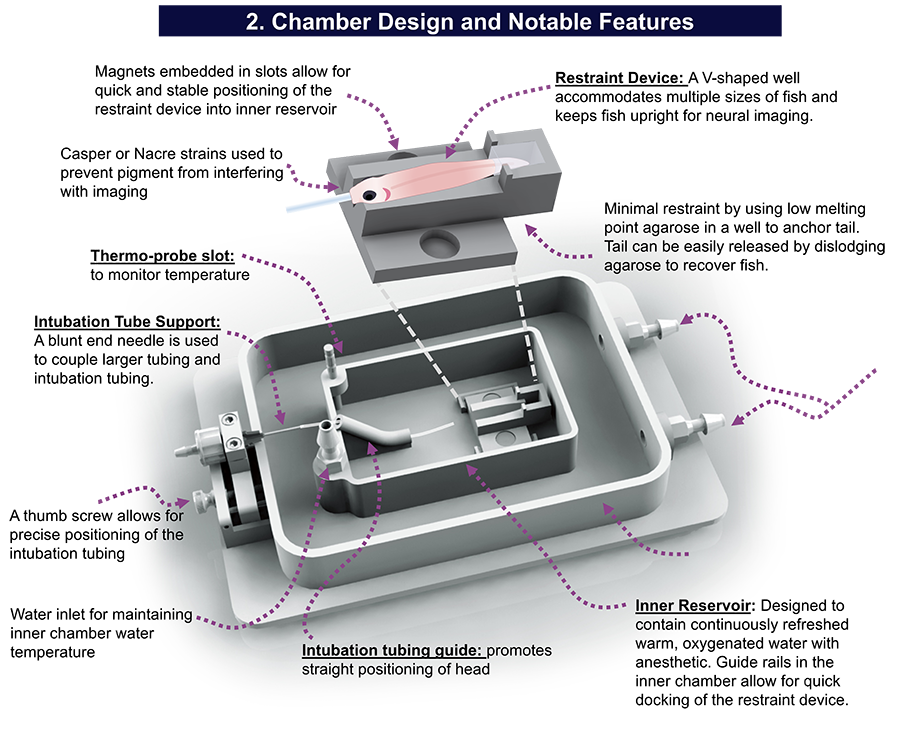
This device can be 3D printed in biocompatible resin or Nylon-12 or produced in glass-filled nylon (our preference). The design features a removable restraint device which secures the fish in place via a V-shaped channel and a small well for low-melting point agarose. The use of the well confines the agarose to only the tail of the fish and allows the fish to be freed from the chamber with minimal effort. Importantly, this prevents low melting point agarose from getting near the fish’s gills. Dental wax can be affixed over top of the fish’s back for further stabilization.
The restraint device docks securely via magnets into the inner reservoir. We have designed the reservoir to include a second overflow reservoir, and two water outlet channels to prevent overflows. For unattended imaging, we recommend adding water overflow sensors. The inner reservoir also features a dock for a temperature monitor probe. The fish is intubated during the imaging period to allow for adequate oxygenation and delivery of anesthetic. To increase the ease of the intubation process, we have added a thumbscrew-adjustment on the intubation tubing support to change the position of the intubation tubing forward and backwards quickly and accurately. This allows for fine adjustments of tube length and position to accommodate different sizes of fish.
Detailed Chamber Assembly:
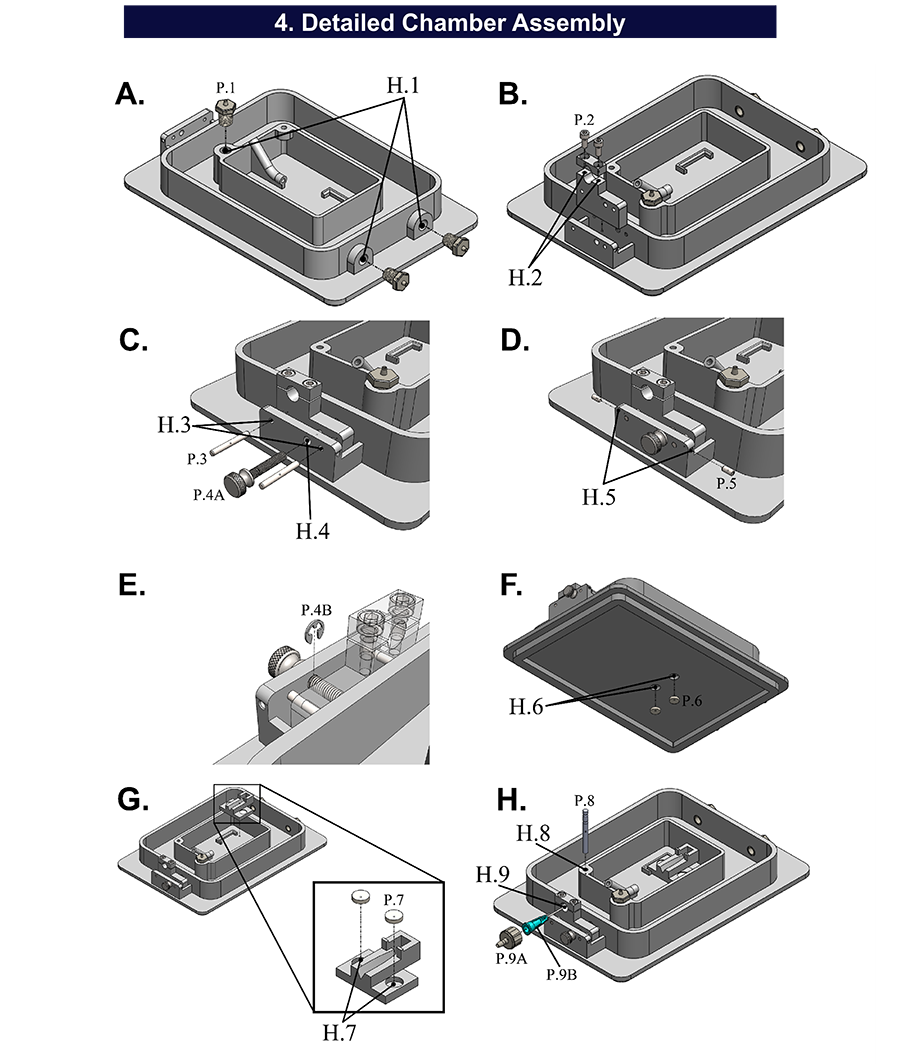
Features in Figure 4 labeled with an H.x are holes
Features labeled with a P.x are the parts corresponding to hole x. ie, P.1 goes into hole H.1.
This device is designed to be 3D printed in biocompatible material that will not corrode. Nylon-12, Nylon-12 glass-filled (GF), and Formlabs BioMed Clear Resin are options for the material. Most photocurable resins are toxic, and even if they are labeled “biocompatible” they may still release particles that can be toxic over continuous usage. For the purposes of the imaging chamber, both glass and Nylon-12 are acceptably inert. Nylon-12 GF provides higher rigidity and strength than Nylon-12 alone. It is important to soak the finished print in generous amounts of distilled water after printing for 24 hours to allow unpolymerized resins and other byproducts of printing to diffuse off the chamber. The chamber is also compatible with sterilization by soaking in 10% bleach overnight.
Finished 3D prints should be sanded to be free of burrs or imperfections which could prevent pieces from mating correctly and tested for leaks prior to use. Neodymium magnets [P.6, P.7] should be attached with non-toxic water-safe epoxy (Water Weld) to the cylindrical indents on the bottom of the outer reservoir [H.6] and the top of the tabs of the inner reservoir [H.7]. To ensure 3D printed holes were not tapered or irregular, all holes [H.1 – H.5] were chased with a drill bit the same size as the final hole circumference. The holes for the outflow and inflow [H.1], adapter support screws [H.2], set screws [H.5], and thumbscrew [H.4] are tapped according to their diameter and thread per inch (specifications included in Figure 3 legend). Only the part of H.4 that goes through the moving piece of the support needs to be tapped. A 0.5mm long groove is cut into the thumbscrew [P.4A] starting 3.5mm from the collar. The resulting diameter of the screw where the groove is must be 3/32” so an external retaining ring can be placed inside to hold the thumbscrew in place [P.4B]. Dowel pins [P.3] are used as rails for the adjustable intubation tube support (see Figure 2).
Tapped holes for inflow and outflow can then fitted with threading-to-barb connectors for 1/16” ID tubes. A blunt end 20G needle is affixed to a male Luer lock to barb connector and mounted in the intubation tubing support mount [P.9A, P.9B]. All tubing adaptors are made to fit 1/16” ID tubing.
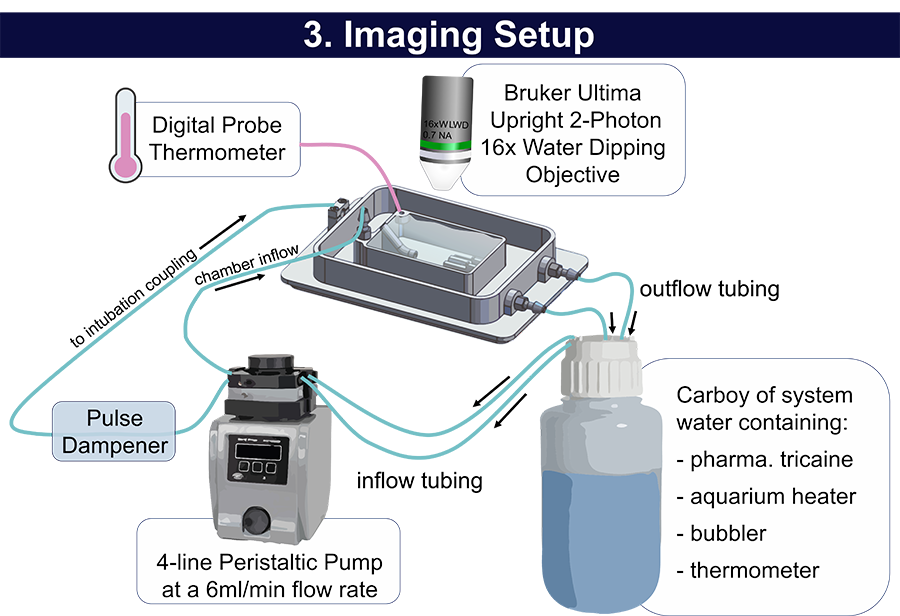
The imaging setup can be assembled as in Figure 3.